Ads 468x60px

Labels

Tuesday, May 1, 2012

Using elements, ID's and classes

The #id selector A very common selector type is the ID based, which we saw in the "Hello, world" example. It uses the ID attribute of a HTML tag to locate the desired element. An ID should be unique, so you should only use this selector when you wish to locate a single, unique element. To locate an element with a specific ID, write a hash character, followed by the ID of the element you wish to locate, like this:
$("#divTest")
An example of it in use:
Now, while there is only a single element that matches our query above, you should be aware that the result is a list, meaning that it can contain more than one element, if the query matches more than one. A common example of this is to match all elements which uses one or several CSS classes. The .class selector Elements with a specific class can be matched by writing a . character followed by the name of the class. Here is an example:
  • Test 1
  • Test 2
  • Test 3
The element selector You can also match elements based on their tag names. For instance, you can match all links on a page like this:
$("a")
Or all div tags like this:
$("div")
If you use a multi-element selector, like the class selector we used in the previous example, and we know that we're looking for elements of a specific type, it's good practice to specify the element type before the selector. Not only is it more precise, it's also faster for jQuery to process, resulting in more responsive sites. Here is a re-written version of the previous example, where we use this method:
$("span.bold").css("font-weight", "bold");
This will match all span elements with "bold" as the class. Of course, it can be used with ID's and pretty much all of the other selectors as well. Selectors can do much more for you though. Read on for more cool examples.

The get() and post() methods

The jQuery get() and post() methods allows you to easily send a HTTP request to a page and get the result back. When you post a form, it's usually either a GET or a POST request, and with jQuery you can mimic that, since both a get() and a post() method exists. The two methods are pretty much identical, since they simply just invoke different request types against the server. They are both static methods, which means that instead of instantiating a jQuery object and then working with that, we call get() or post() directly on the jQuery class, either by writing jQuery.get() or by using the shortcut character like this: $.get(). In its most simple form, the get() and post() methods takes a single parameter, which is the URL that you wish to request. However, in most cases you will want to do something with the returned data, in which case you can pass a callback function as a parameter, which jQuery will call if the request succeeds. Let's do some testing. In the previous chapter, I created an HTML file called "content.html", which we loaded using the jQuery load() method. When testing the following example, make sure that you have a file called "content.html" in the same directory as the file in which you have the example. The content doesn't really matter, just write anything in there really. Here's an example of the get() method: Try this example

The first parameter is the URL, which is just content.html. The second parameter is more interesting. It's a callback function, which jQuery calls if the page request succeeds. The first callback parameter is simply the content of the page requested, while the second callback parameter is the textual status of the request. You can of course request a simple HTML page, like in the example above, but normally the reason for using a GET or a POST request is that you wish to pass in some parameters, which is then processed by the server, for instance with a piece of PHP, ASP or ASP.NET code, and then return the result. jQuery can take a map of GET or POST parameters, which we will try in the following example, where we use the post() method: Try this example

This example is much like the first one, but we make the POST request to another page, in this example a PHP page, and as the second parameter, we pass in a map of POST parameters. The map is constructed of two parameters, a name and an age. If we had used a GET request instead of a POST request (POST requests doesn't take parameters from the URL like GET does), the above code would actually have corresponded to requesting an URL like this in your browser: test_get.php?name=John Doe&age=42 The PHP script can then read the parameters, process them and return a result. The script on our server simply takes the two values and creates a string like " is years old" and then returns it, which you can see if you test the example above.

The remove() and empty() methods

In the last couple of chapters, we have worked with adding new elements to a page, but of course jQuery can help you remove them as well. There are mainly two methods for this: remove() and empty(). The remove() method will delete the selected element(s), while the empty() method will only delete all child elements of the selected element(s). The following example should illustrate the difference - be sure to click the links in the right order though:
empty() div   
remove() div
Bold text Italic text
The first link will call the empty() method on our test div, removing all the child elements. The second link will remove the entire div, including any child elements. Pretty simple stuff. The remove() method comes with one optional parameter, which allows you to filter the elements to be removed, using any of the jQuery selector syntaxes. You could of course achieve the same simply by doing the filtering in your first selector, but in some situations, you may be working on a set of already selected elements. Check out this example of it in use:
remove() more bold
Bold text
More bold text
Even more bold text
We start out by selecting all bold tags inside our test div. We then call the remove() method on the selected elements, and pass in the .more filter, which will make sure that we only get elements which uses the class "more". As a result, only the last two bold texts are removed. You can of course use even more advanced selectors as a filter too. Have a look at the "Selectors" topic of this tutorial for inspiration.

The before() and after() methods

In the previous chapter, we used the append() and prepend() methods to insert stuff inside an element, but in some cases, you need to insert things before or after one or several elements instead. jQuery has the before() and after() methods for just this purpose, and they are just as easy to use. Check out this example: Try this example
Before   
After


Depending on which of the two links you click, an italic or a bold tag will be inserted before or after each input element on the page using the "test1" class. Just like with append() and prepend(), both after() and before() allows you to use HTML strings, DOM elements and jQuery objects as parameters and an infinite amount of them as well. We'll demonstrate that in the next example: Try this example
Insert elements


Hello world?
In this example, we create a jQuery object, an HTML string and a JavaScript DOM element, and then we use the after() method to insert all of them after our span tag. Of course, the before() method could have been used in exactly the same way. There are variations of the before() and after() methods, called insertBefore() and insertAfter(). They do pretty much the same, but they do it the other way around, so instead of calling them on the elements you wish to insert data before or after, with a parameter of what is to be inserted, you do the exact opposite. Which method to use obviously depends on the situation, but here's an example showing you how to use them both: Try this example
Insert elemenets


Hello world?
In this example, we insert the items before the span tag, but you could of course do the exact same using after() and insertAfter(), if you wish to insert after the target elemenet. As you can see, the result is the same - only the order of what we do differs.

The append() and prepend() methods

Adding new stuff to existing elements is very easy with jQuery. There are methods for appending or prepending, taking HTML in string format, DOM elements and jQuery objects as parameters. In the next example, you will see how easy it is to insert new elements in a list, using both the append() and the prepend() method:
Append   
Prepend

  1. Existing item
  2. Existing item
We have to links: The first will append an item to the list, meaning that the new item will be inserted as the last item. The other link will prepend a link to the list, which means that the new item will be inserted as the first item of the list. In this example, we simply insert a piece of HTML, but we could have generated the new items with jQuery as well, or created it through regular JavaScript code and DOM elements. In fact, both the append() and the prepend() method takes an infinite amount of new elements as parameters. In the next example, we will demonstrate this as well as the ability to add elements in various forms:
Append items   
    As you can see, item1 is a jQuery generated element, item2 is a simple HTML string and item3 is a JavaScript DOM generated element. They are all appended to the list using the same call and of course this would have worked for the prepend() method too. There are variations of the append() and prepend() methods, called appendTo() and prependTo(). They do pretty much the same, but they do it the other way around, so instead of calling them on the elements you wish to append/prepend to, with a parameter of what is to be appended/prepended, you do the exact opposite. Which to use obviously depends on the situation, but here's an example showing you how to use them both:
    Prepend items   
    
      In this example, we prepend the items, but you could of course do the exact same using append() and appendTo(). As you can see, the result is the same - only the order of what we do differs.

      Getting and setting CSS classes

      Just like it's very easy to manipulate content and attributes of elements, as we saw in the previous chapters, it's equally easy to manipulate the CSS of elements. jQuery gives you easy access to changing both the style attribute, which you manipulate using the css() method, as well as the class(es) of an element, where several different methods lets you modify it. Let's start by looking into changing the class attribute. The class attribute takes one or several class names, which may or may not refer to a CSS class defined in your stylesheet. Usually it does, but you may from time to time add class names to your elements simply to be able to reach them easily from jQuery, since jQuery has excellent support for selecting elements based on their class name(s). I have defined a couple of very simple CSS selectors in my stylesheet, mostly for testing purposes:
      .bold {
              font-weight: bold;
      }
      
      .blue {
              color: blue;
      }
      
      In the following example we will use three of the most interesting class related methods: hasClass(), which checks if one or several elements already has a specific class defined, addClass(), which simply adds a class name to one or several elements and the removeClass() methods, which will.... well, you've probably already guessed it.
      Toggle class


      The example is actually very simple. When the link is clicked, we send the link itself (this) as a parameter to the ToggleClass() method that we have defined. In it, we check if the sender already has the "bold" class - if it has, we remove it, otherwise we add it. This is a pretty common thing to do, so obviously the jQuery people didn't want us to write an entire three lines of code to it. That's why they implemented the toggleClass() method, with which we can turn our entire example above into a single line of code:
      Toggle class
      
      Of course, we can select multiple elements, where we can add or remove multiple classes, as well. Here's an example of just that:
      Test 1
      Test 2
      Test 3
      First we select the span and the b tag, which we add a single class to: the bold class. Then we select the div tag, which we add two classes to, separated by a space: The bold and the blue class. The removeClass() methods works just the same way, allowing you to specify several classes to be removed, separated with a space.
      Getting and setting attributes [attr()]

      In the previous chapter, we saw how easy it was to get and set text and HTML content from and to an element. Fortunately, changing one or more attributes of an element is just as easy. We use the attr() method for this, which in its simplest form takes one parameter: The name of the attribute we wish to get:
      Google Link
      
      
      In this example, we get the value of the "href" attribute of our link and then show it to the user. To change an attribute, we simply specify an extra parameter:
      Google Link
      
      
      This will change the link to point to the British version of Google. The attr() method can also take a map of name/value pairs, for setting multiple attributes at the same time. Here we set both the href and the title attributes simultaneously:
      Google Link
      
      
      The attr() method also supports the special overload where the value parameter is instead a callback function, allowing you to access the index of the element selected as well as the existing attribute value. Here's an example of just that:
      Google.com
      Google UK
      Google DE
      We simply change all the Google links to point to the Image search instead of the default page, by adding an extra parameter to the href attribute. In this example we don't really use the index parameter, but we could have if we needed it, to tell us which index in the list of elements selected we're currently dealing with.

      Getting and setting content [text(), html() and val()]

      The simplest aspect of DOM manipulation is retrieving and setting text, values and HTML. These three things might seem like the same thing, but they're not. Text is a textual (no HTML) representation of the inner content for all regular elements, values are for form elements and HTML is the same as text, but including any markup. Fortunately for us, jQuery comes with a method for each of the three, allowing us to both retrieve and set these properties: The text(), html() and val() methods. Here's a little example which will show you the difference between them and how simple they are to use:
      Test
      So a call to one of these methods with no parameters will simply return the desired property. If we want to set the property instead, we simply specify an extra parameter. Here's a complete example:
      And that's how easy it is to set text, HTML and values. These three functions comes with one overload more though, where you specify a callback function as the first and only parameter. This callback function will be called with two parameters by jQuery, the index of the current element in the list of elements selected, as well as the existing value, before it's replaced with a new value. You then return the string that you wish to use as the new value from the function. This overload works for both html(), text() and val(), but for the sake of simplicity, we only use the text() version in this example:

      Paragraph 1

      Paragraph 2

      Paragraph 3

      We start out with three similar paragraph elements, which text is their only difference. In the jQuery code, we select all of them and then use the special version of the text() method to replace their current text with a newly constructed text, based on the two parameters that jQuery provides for us: The index of the current element as well as its current text. This new text is then returned to jQuery, which will replace the current text with the new one.

      Stopping animations with the stop() method

      In the previous chapter, we saw how we could do custom animations using the animate() method and how we could have several animations after each other, by making several animation calls and thereby using the animation queue of jQuery. However, sometimes you need to stop an animation before it finishes, and for this, jQuery has the stop() method. It works for all effects related jQuery functions, including sliding, fading and custom animations with the animate() method. Here's an example where we use it:
      
      Show box   
      Stop


      To make the example a bit more compact, I have used inline calls in the onclick events of the two links. When you click the first link, the slideDown() method is used on our div element, starting a slow slide down. A click on the second link will kill the current animation being performed on the selected element. This is the default behavior of the stop() method, but two optional parameters allows us to do things differently. The first parameter specifies whether the animation queue should be cleared or not. The default is false, which means that only the active animation will be stopped, allowing any queued animations to be performed afterwards. The following example will demonstrate that:
      Show box   
      Stop   
      Stop all   
      Reset


      We have added a second animation to the "Show box" link. This will slowly slide down the box, and once done, slide it up again. The queue system makes sure that these steps are performed in sequence. Now, click the "Reset" link to have the box hidden again and then click the "Show box" link once more, followed by a click on "Stop". You will see that the first animation is stopped, allowing for the second animation to be executed. However, if you try again and click on the "Stop all" instead, the true value passed will make sure that the entire queue is cleared and that all animation on the element is stopped. The second parameter tells jQuery whether you would like for it to just stop where it is, or rush through the animation instead, allowing for it to finish. This makes a pretty big difference, because as you can see from the first example, once you hit stop, the default behavior is to simply stop the animation where it is and leave it like that. The following example will show you the difference:
      Show box   
      Stop   
      Stop but finish   
      Reset


      Try the two "Stop" variations - the first will stop immediately, while the second one will rush the animation to finish.
      In previous chapters, we looked into the built-in fading and sliding effect methods of jQuery. However, you can much more than just that. With the animate() method, you can create custom animations where you manipulate pretty much any numerical CSS property of an element. This allows you to e.g. move a box slowly across the screen or have it jump up and down. Let's try something very simple:
      The first, and only required, parameter of the animate function is a map of the CSS properties that you wish to have altered. In this case, we have an absolutely positioned div element, which we tell jQuery to move until it has reached a left property of 200 pixels. The second parameter allows you to specify the duration of the animation in milliseconds or as "slow" or "fast" which is the same as 600 or 200 ms. With this, we can slow down the above example as much as we want:
      As the third parameter, we can specify a callback function to be called once the animation is done. This can be very useful for performing a number of different animations in a row. For instance, check out this example:
      It might seem a bit overwhelming, but what we do is that we call the animate method and ask for the left property of our test "div" to be animated until it reaches a left of 100 pixels. We want it to take 1 second (1000 milliseconds) and once it completes, we wish for a new animation to start, which moves it back to 20 pixels within half a second, and as soon as THAT animation is done, we move it a bit right again, so that it now has a left property of 50 pixels. However, since jQuery comes with queue functionality for animations, you can actually achieve the above example in a much simpler manner. This however only applies when you want a set of animations to performed after each other - if you want to do something else when an animation is complete, the above example will still be the way to go. Here's the queue version:

      The load() method in jquerry part3

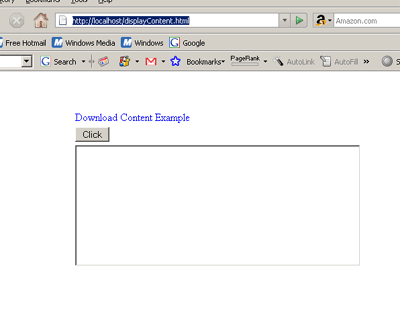
      jQuery Load Content In this section you will learn how to load content of a text file using jQuery and show it on the use browser. This example shows you how to load the content of simple text file and then show on the text box. Our jQuery Load Content example will do the following work 1. Web page is displayed with a button "Load Content" and a blank text box 2. User clicks on the "Load Content" button. 3. jQuery loads the context of a text file "testFile.txt" and displays in the text area After completing this example you will be able to use jQuery to Load the content from server side text file and show it to the user. Code: 1. HTML Page Here is the code of "displayContent.html" file
      Show Content


      Download Content Example
      2. jQuery code in the page The following jQuery code retrieves the data from server and display in the text area.
      function contentDisp()
      {
      $.ajax({
      url : "textContent.php",
      success : function (data) {
      $("#contentArea").html(data);
      }
      });
      }
      
      3. Content of the text file Here is the content of the text file: Welcome to RoseIndia.Net jQuery Tutorials Learn how you can do a lot of work with small code. jQuery is here to help us in achieving high result with less coding. jQuery is great!!!! 4. Program screen shot Open your browse and type http://localhost/displayContent.html. Your browser should look like:

      Now click on the "Click" button. The program will fetch the text data from database and display in the text area as shown below:

      In this example you leaned how to fetch the text data from server and display in the text area.
      Try the example online

      The load() method in jquerry part2

      As described in the previous chapter, there are many ways to use AJAX with jQuery, and they should of course be used depending on the situation. One of the simplest and yet still powerful methods for loading data asynchronously is the load() method. You use it by selecting an element where you want the content loaded to and then call the load() method on it. It takes the URL that you wish to load, as a parameter. For this example, we need a an external file that we can load. We'll call it content.html and the content of it should look something like this:
      This is external content
      And there's more of it Save it as content.html, in the same directory where you keep your other example files for this tutorial. We can load it as simple as this: Try this example
      If you have the content file in another directory, or if you have named it differently, you will have to change the parameter for the load method accordingly. This is all it takes to load content from an external file with jQuery and the load method. A pretty cool trick is that you can actually pass a selector along with the URL, to only get a part of the page. In the first example, we loaded the entire file, but in the following example, we will only use the div, which contains the first sentence: Try this example
      As you can see, we simply append a standard jQuery selector to the parameter, after the URL, separated with a space. This causes jQuery to select the content out and only pass the matched part(s) back to the container. You can use any jQuery selector type to pull off this trick, which makes it pretty powerful. The load method can take two extra parameters: A set of querystring key/value pairs, and a callback function which will be executed when the load method finishes, no matter if it succeeds or fails. Here is an example where we use the callback function to inform about the result. Normally, you would likely only show a message if the method fails, but to illustrate how it works, we do it if the method fails as well. I make sure that it fails for the example, by requesting a file which doesn't exist: Try this example
      As you can see, the callback function specifies 3 parameters, which jQuery will fill in for you. The first parameter will contain the resulting content if the call succeeds. The second parameter is a string which specifies the status of the call, e.g. "success" or "error". You can use it to see if the call was successful or not. The third parameter is the XMLHttpRequest object used to perform the AJAX call. It will contain properties which you can use to see what went wrong and many other things.

      Simple loading of HTML fragment using jQuery AJAX

      jQuery provides a simple load() function to load an HTML fragment using AJAX. To test it, create a test data file called data.html:
        
          
      • Item 1
      • Item 2
      • Item 3
      • Item 4
      Next, create a target HTML file called testLoad.html in the same folder with the following jQuery statement:
        
          jQuery load HTML test


      When you view testLoad.html, you should see the list items in data.html inserted into the target file, in the unordered list named myLinks. It was a little fiddly to get this working the first time. If your source HTML file has an error, nothing seems to happen; in that case, check your browser's error console to see what went wrong. For instance, in Firefox, when my source HTML file wasn't well-formed, I found this error: Error: mismatched tag. Expected: . Source File: Line: 8, Column: 5 Source Code: Another thing I found is that you can't include an XML processing instruction ( lines) in your data file because when load() tries to insert your XML file into your target document, you would get an error like this: Error: XML or text declaration not at start of entity Source File: Line: 1, Column: 43 Source Code:


      Sample text

      Sample Text

      Sample Text